Method 1: Look for Hidden Images
If you open a patient and cannot find images in their SOTA Cloud account, someone in the office may have accidentally hidden the images. Check for hidden exams and unhide them if needed:
- Review this article to learn how to look for hidden exams and unhide them: Show/Hide Exams in SOTA Cloud
Method 2: Search for Duplicate Patients
If you suspect missing images might be under a duplicate patient record, we recommend manually searching for the patient using different name combinations:
- Open SOTA Cloud
- Click Patient List
- Search using these variations:
- First and last name
- First name only
- Last name only
- Set your location scope:
- Single location: If you have only one location attached to your SOTA Cloud site, proceed directly to step 5
- Multiple locations: If your practice has multiple locations linked to one SOTA Cloud site, first click "All Locations" to the right of the Range button before setting the date and time. This helps determine if images were taken under the wrong location
- Click Enter to see if you have a duplicate patient. If you find a duplicate, you'll want to merge them. For guidance on merging, please refer to this article: Merging Patient Records
Method 3: Search by Date Range
Use the Date Range Tool to locate images that may have been captured under the wrong patient or location:
- Open SOTA Cloud
- Click Patient List
- Set your location scope:
- Single location: If you have only one location attached to your SOTA Cloud site, proceed directly to step 4
- Multiple locations: If your practice has multiple locations linked to one SOTA Cloud site, first click "All Locations" to the right of the Range button before setting the date and time. This helps determine if images were taken under the wrong location
- Locate the Range Option to the right of the search bar, which allows you to search for images by date and time

- Click the Range button and enter the date and time range when the images could have been taken
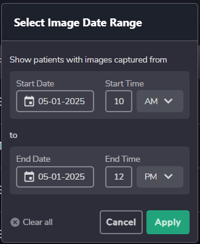
- Click Apply and review the results
Review and Action Steps
After running your search, follow these steps to locate and organize your images:
- Check for duplicate patients in the search results
- If you find duplicates that need merging, refer to the Merging Patient Records article
- If there are no duplicates, proceed to step 2
- Document your findings by writing down each patient who appears in the search results
- Verify patient assignments by returning to the search patients window and searching for each patient individually to check if images were taken under the wrong patient
- Reassign images if needed - If you discover images under the wrong patient, reassign them to the correct patient using the process outlined in this article: Reassign Exams
Quick Tips
- Always search "All Locations" when working with multiple practice locations
- Try different name combinations when manually searching for patients
- Keep a record of patients found in your date range search for systematic review
- Use both methods together for the most comprehensive search